


Table of Contents
Climbing Knots: The 8 Essential Climbing Knots You Need To Know
Climbing is an exciting adventure that requires skill, accuracy, and safety above all else. Learning the fundamental knots is one of the most important parts of climbing. We’ll go over the top eight climbing knots that every enthusiast needs to know in this guide. These knots are essential to your success and safety on the rocks, regardless of your level of experience.
Figure Eight: Follow Through: The Universal Tie-In Knot

Climbers typically tie the figure-eight follow-through knot because it is a safe and widely recognized method of tying into a harness.
It is a dependable option for anyone climbing a rock face because it is simple to check and tie. Learning how to execute the figure-eight follow-through safely on the wall is crucial for all climbers, regardless of experience level.
How to Tie a Figure Eight Follow-Through:
- Pass the working end behind the rope, loop it around, and pass it into the eye to form a figure-eight.
- As an alternative, form a bite, twist it twice, insert your hand through it, and pull the working end through.
- Make sure the working end goes in the opposite direction of the exit as it passes through your tie-in point.
- For added security, tie a safety knot akin to the fisherman’s knot.
Triple Fisherman’s Knot: Shock Absorption Master
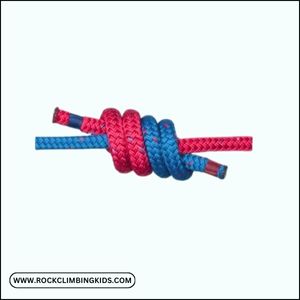
Climbers love the triple fisherman’s knot because it’s perfect for absorbing shock and acts as a cushion on strenuous climbs.
A sturdy and dependable connection is produced by tying three overhand knots in a particular manner. Because of its capacity to absorb shock, it is an invaluable tool for climbers, enabling them to safely and confidently traverse difficult terrain.
A climber’s toolkit must include the triple fisherman’s knot, whether they are ascending a rock face or a steep incline.
How to Tie a Triple Fisherman’s Knot:
- Twirl the working ends around one another three times, pointing in opposing directions and overlapping.
- To tighten the knot, tuck the ends under one another.
Flemish Bend: A Solid and Trustworthy Knot
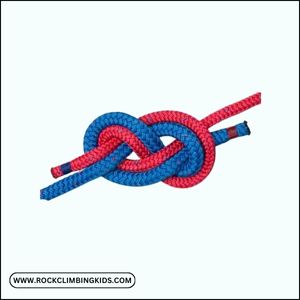
The Flemish bend, sometimes called the figure-eight bend, is a strong knot that can support a lot of weight.
The Flemish bend, sometimes called the figure-eight bend, is a strong knot that can support a lot of weight. It is frequently used in rock climbing, sailing, and other sports where a sturdy knot is necessary for security.
This knot is a good option for connecting two ropes because of its reputation for stability and security. Whether you’re making a belay anchor, rigging a sail, or securing a load, the Flemish bend is a reliable solution that works well in difficult circumstances.
How to Tie a Flemish Bend:
- Twist it twice after taking a bite.
- To make a figure eight, reach through the eye and pull the working end through.
- With the working end of the second line, follow the line in Figure 8.
- For extra security, tie an overhand knot at the end.
Alpine Butterfly Loop: Versatile Midline Loop
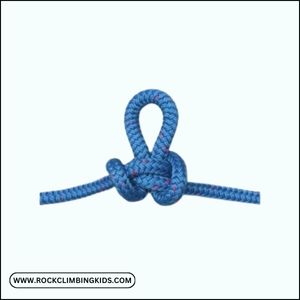
The Alpine butterfly loop is a versatile midline loop that can support loads in any direction and is used in climbing and rigging.
A dependable and simple knot to tie and untie, the Alpine butterfly loop is a favorite among many outdoor enthusiasts. Because of its strength and adaptability, it’s a necessary skill for anyone engaged in climbing, rigging, or other activities requiring a secure midline loop.
How to Tie an Alpine Butterfly Loop:
- Take a bite and turn it twice to start.
- Turn the loop that is farthest below the closest loop.
- For a safe Alpine butterfly loop, fish the bigger loop through the smaller loop’s eye.
Water Knot: For Tape or Tube Webbing
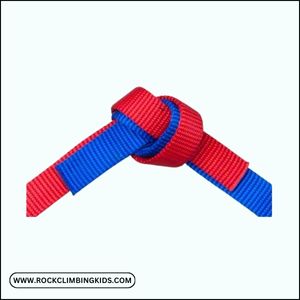
The water knot is a safe and adaptable choice for making slings or anchors out of tape or tube webbing.
The water knot is a useful option for outdoor pursuits like rock climbing, mountaineering, and caving because it’s simple to tie and untie. To guarantee the strength and dependability of this knot when in use, it is crucial to learn how to tie it correctly.
How to Tie a Water Knot:
- Tighten the knot overhand, leaving plenty of tail.
- Utilizing the second piece of tape, follow the original knot in the opposite direction.
- Make sure the two tape pieces are flat against one another before tightening the knot.
Clove Hitch: Anchor Building Essential
In the event of a fall, the clove hitch is necessary for securing and anchoring oneself to the wall.
It’s an easy-to-tie knot that works well in a variety of circumstances. Understanding how to tie a clove hitch is essential for your safety, whether you are rappelling, rock climbing, or setting up a belay.
This multipurpose knot can also be used to fasten yourself to a fixed object, secure loads, or create a temporary anchor point. Once you have mastered the clove hitch, you will have the self-assurance to take on difficult climbs and effortlessly negotiate difficult descents.
How to Tie a Clove Hitch:
- Create two loops that are the same, then stack the second loop on top of the first.
- To clip in, extend your arm around the top rope, create a bight, then flip and rotate your wrist.
Prusik Knot: The Ascender and Self-Rescue Knot
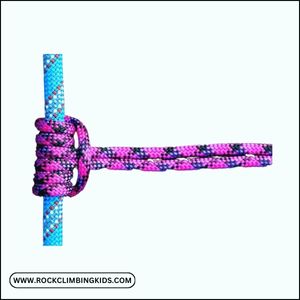
The Prusik knot grips under tension and slides easily when not loaded. It is used for self-rescue, ascending, and backing up a belay.
Because it offers a dependable, adjustable friction hitch that works well in a range of circumstances, the Prusik knot is an invaluable tool for climbers and mountaineers.
The Prusik knot is a crucial ability to have, whether you need to climb a rope, retrieve a belay, or conduct a self-rescue. It is a useful and adaptable knot for any outdoor enthusiast because of its capacity to slide when not loaded and to grip under tension.
How to Tie a Prusik Knot:
- Double or triple fisherman’s knot an accessory cord to form a loop.
- Set the knot off-center to prevent direct pressure.
- Wrap the larger portion of the loop three or four times through the smaller loop after passing a portion of it behind the rope.
- To ensure a seamless operation, dress the knot.
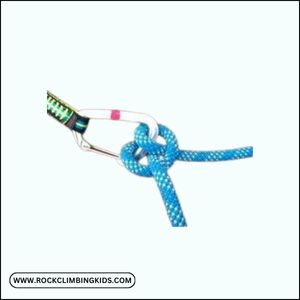
Munter Hitch: Your Descending Control

When a belay device is not available, a rescue knot called the Munter hitch is utilized. It catches falls and regulates descents.
In an emergency, the Munter hitch is a fast and simple knot that is dependable and adaptable. It is a crucial ability for any climber or rescuer since it offers a friction hitch that enables steady and controlled descents.
The Munter hitch is an invaluable tool to have in your toolbox, whether you’re lowering a partner to safety or rappelling down a cliff. You can safely and successfully use the Munter hitch in any circumstance if you have the right information and practice.
How to Tie a Munter Hitch:
- On the braking side, make a bight and twist it twice counterclockwise.
- Attach a carabiner to the climbing side loop.
- When you go from receiving to imparting slack, flip.
In summary
Ascending It’s imperative that you understand these eight knots for both success and safety. If you can master these techniques, you’ll be well-equipped to face the difficulties that come with climbing to higher altitudes. Please get in touch if you have any specific knot requests or inquiries. Please like, share, and subscribe for more insightful content about the climbing world. Be careful when you’re out there!
Related Posts


Discussion about this post